How a Tank Alarm Installation Actually Works (With Photos)
A lot of customers book without being entirely sure what to expect on installation day. This article walks through a real installation in sequence — what we do, why we do it, and what you’re left with at the end.
Note: Installation photos will be added to this post as our first installations complete. The process described below reflects our standard approach.
Before we arrive
Once your booking is confirmed and deposit received, we’ll call you within 24 hours. This call covers:
- Tank type and location — bunded or single-skin, indoor or outdoor, position relative to the house
- Sensor installation method — which of our three sensor options suits your tank best (32mm drill, existing access port, or no-drill radar)
- Cable routing — where we’d run cables from the tank to the siren location
- Solar panel positioning — south-facing and unobstructed is ideal; we discuss what’s achievable at your property
- Access — gates, locks, specific instructions for parking or entry
This means we arrive on the day fully prepared, with the right components and a plan. Installations that need adapting on the day are slower and occasionally more expensive — the pre-install call prevents this.
On arrival: initial assessment
The first 10–15 minutes are an on-site assessment. We confirm what was discussed on the phone matches the reality of the installation, and make final decisions about:
- Sensor installation method and exact positioning
- Siren mounting location and orientation (for maximum audibility)
- Cable route — conduit path, any buried runs if preferred
- Solar panel positioning
We’ll walk through the plan with you before starting work.
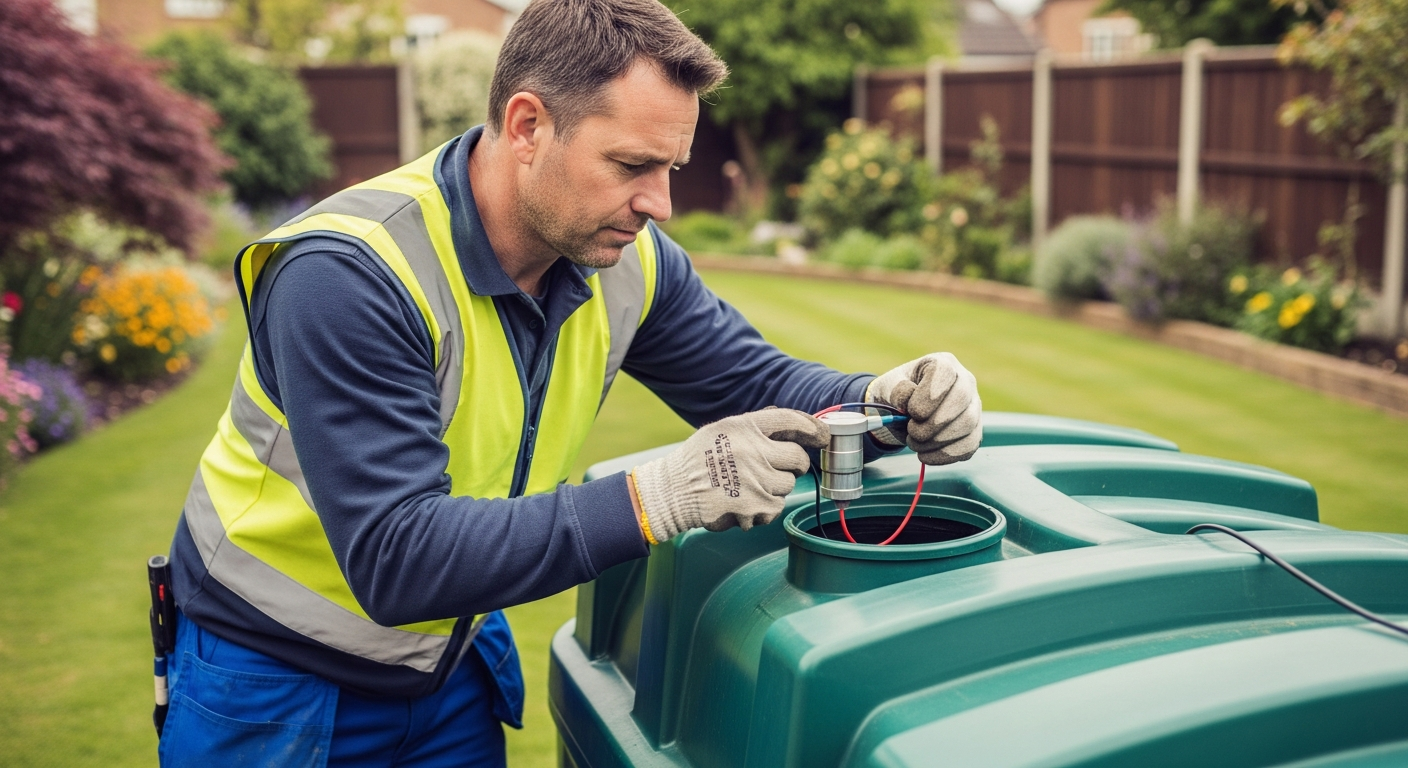
Sensor installation
The fuel level sensor is installed in the tank top using the most suitable method for your tank:
- The sensor area is cleaned and prepared
- The sensor is installed — either via 32mm drill into the tank top, through an existing access port, or externally using the no-drill radar option
- Wiring from the sensor is routed in protective conduit toward the control unit location
- All connections are weatherproofed
Time: 20–40 minutes depending on tank configuration and access.
Control unit and cable routing
The control unit — which processes the sensor input, manages the alarm state, and communicates with the fob — is positioned in a sheltered location near the tank (often on an outbuilding wall or behind the tank housing).
Cables are routed in conduit along walls or fences. We use surface-mounted conduit as the default — neat, weatherproof, and removable if ever needed. For customers who prefer buried cable runs, we can accommodate this with additional notice.
Time: 20–50 minutes depending on cable run length and routing complexity.
Siren mounting
The external siren is positioned for maximum audibility and deterrent effect. Typical positions:
- On an outbuilding wall, high enough to be visible and audible at range
- On a fence post or telegraph pole near the tank
- On the main house wall facing the approach route
The siren housing is weatherproof to IP65 — it’s designed for continuous external exposure. We check the sight lines and discuss the position with you before fixing.
Time: 15–25 minutes.
Solar panel installation
The solar panel is positioned for maximum year-round exposure. In the UK, south-facing at an angle of 30–40 degrees from horizontal gives the best annual output. The system requires no mains connection — the panel and LiFePO4 battery handle all power requirements.
We discuss positioning with you and fix the panel securely. The solar connection to the control unit is weatherproofed.
Time: 15–30 minutes.
Commissioning and testing
Before we leave, the full system is tested:
- Alarm trigger test — we simulate an unexpected fuel level drop and confirm the siren activates immediately
- Fob range test — we walk the property perimeter confirming the fob disarms correctly at range
- Tamper test — we verify the tamper detection triggers the alarm as expected
- Reset test — we confirm the system resets cleanly after disarming
Any issues identified in testing are resolved before we leave.
Handover
Once testing is complete, we walk you through the system:
- How to arm and disarm using the fob
- What to tell your oil delivery driver (and we leave a laminated card at the tank)
- What the different alarm states mean
- What to do if the siren activates when you weren’t expecting it
- Warranty terms and how to contact us if there’s an issue
You receive a copy of your warranty documentation. The system is live, tested, and operational.
Total installation time: typically 1.5–2.5 hours.
Ready to book your installation? →
Want a Tank Alarm fitted?
Professional oil tank alarm installation across East Anglia. £499 fitted, 12-month warranty.
Book installation here →